|
Gas Trenching - Day One
Prerequisites for Gas:
- Not really a pre-req, but the heater must be present (if a natural-gas powered heater will be used for heating spa/pool) so that they can do the hookup prior to completing job.
Natural gas is not needed for a pool unless you plan to heat it with a natural gas-powered heater. Or, you may want to put in a spa and heat it the same way . In my case, I also wanted to put in a gas-powered BBQ, Beehive Fireplace, and a Fire Pit Ring as   well. Gas runs are expensive here in AZ - about $9.00-$10.00 / foot for the main line from your gas meter to the equipment pad. Electrical runs by comparison are typically less than half that cost. I found out quickly that when gas in involved, it will pretty much dictate where the equipment is going to be placed - unless of course you've got money to burn. If money wasn't an object, I would have located the equipment on the right side of the house where it would have been hidden better and would have been on the side of the house that gets no traffic (no gate on that side). well. Gas runs are expensive here in AZ - about $9.00-$10.00 / foot for the main line from your gas meter to the equipment pad. Electrical runs by comparison are typically less than half that cost. I found out quickly that when gas in involved, it will pretty much dictate where the equipment is going to be placed - unless of course you've got money to burn. If money wasn't an object, I would have located the equipment on the right side of the house where it would have been hidden better and would have been on the side of the house that gets no traffic (no gate on that side).
CONTINUED BELOW
ADVERTISEMENT
It would have been located closer to the electrical service panel but the gas run would have been twice the length. Unfortunately, because of the cost issue, I had to locate it on the side of the house which is closer to the gas meter. That happens to be the side that gets all the traffic and is much more narrow. Go figure. There wasn't a lot I could do about it.
Most gas subs I talked to have what they call a base price which includes a standard amount of gas line. This base price is right around $500. It typically includes:
-
City Permit (if applicable for your AZ city) for the gas work
-
25 ft of gas line (typically they run 1-1/2" Polyethylene/Scotchcoat line) from your gas meter to equipment
-
Includes hookup to the gas meter and heater and all material and labor
Additional charges will be incurred for:
-
Any additional 1-1/2" Polyethylene line past the first 25 ft.
-
Any hand digging, hard digging, or under sidewalk tunneling that is necessary
-
Additional line for other devices (typically this would be 3/4" PE line tapped off the 1-1/2" PE main) and the associated fittings, valves, risors, "T"s, rings, etc. necessary
-
Any PVC sleeving that would go under decking. This sleeving houses the gas line under the deck. The idea is that if there ever were a leak in the PE line, the gas would be forced to follow the PVC sleeving until it came up out of the surface rather than saturating under the ground.
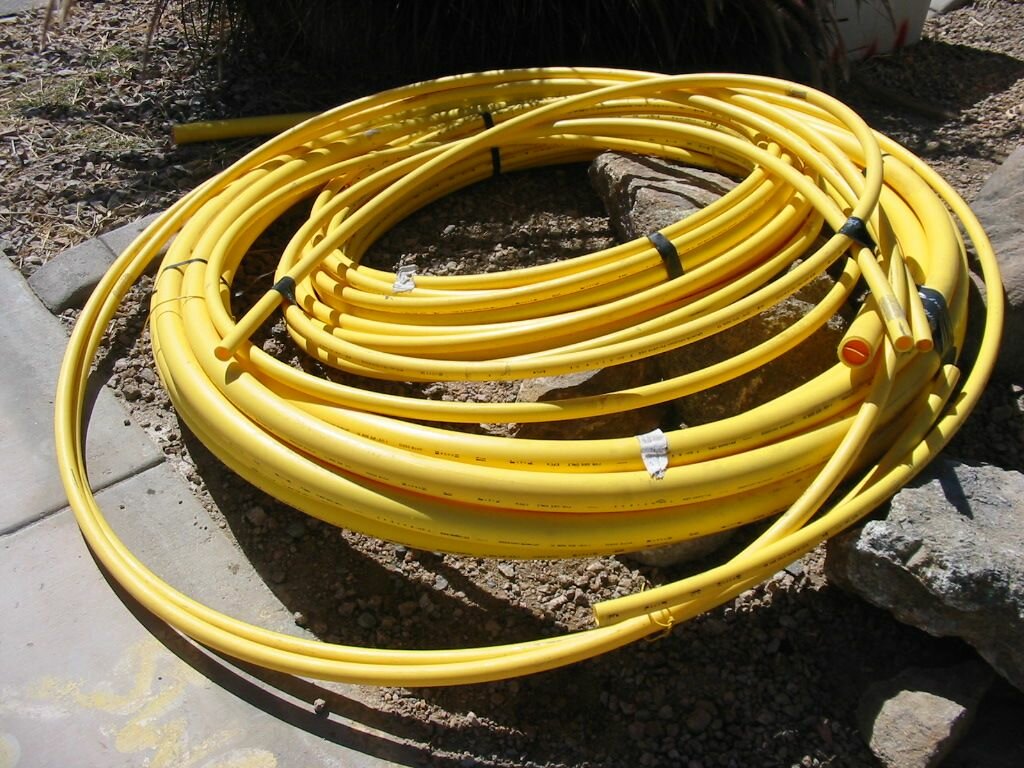
The gas work requires a separate permit by the City of Chandler. Fortunately, I didn't have to deal with it. Most gas subs will include it as a part of the base price. It usually takes a few days for them to get the permit. Its done by the same group that gave me my permit for the pool. Anything above and beyond the 25ft of included gas line will be extra. And this is where it gets expensive. Anything over the first 25ft of line (for the main) will be charged at $9-$10 per foot. This is typically 1-1/2" - 2" PE line depending on the length of your gas run and the amount of BTU's you will be burning. You can see the 1-1/2" PE line in the picture to the right. Also, if you are going to add a gas BBQ/Fireplace/Kiva/Tiki Torches/Firepits or any other item that requires gas, what they do typically is tap off your gas hookup at your equipment and run smaller line (typically 3/4" to 1" PE line depending same group that gave me my permit for the pool. Anything above and beyond the 25ft of included gas line will be extra. And this is where it gets expensive. Anything over the first 25ft of line (for the main) will be charged at $9-$10 per foot. This is typically 1-1/2" - 2" PE line depending on the length of your gas run and the amount of BTU's you will be burning. You can see the 1-1/2" PE line in the picture to the right. Also, if you are going to add a gas BBQ/Fireplace/Kiva/Tiki Torches/Firepits or any other item that requires gas, what they do typically is tap off your gas hookup at your equipment and run smaller line (typically 3/4" to 1" PE line depending  on how many BTUs your device is capable of and how long the run is) to your various hookups. Each item hookup also requires a Tee and Risor and is terminated with a key valve. The key valve is what will be visible on the surface of the Fireplace or Firepit. Its a valve that is turned on or off with a key. You can see a picture of it to the left. When I called Barbeques Galore here in Chandler, they told me that even their biggest BBQ units only required 1/2" gas line. When I checked with the subs, no one did anything smaller than 3/4" PE. I guess they do that as a margin of safety. The only other thing they charge for is if they have to do hard digs (through a lot of rocks, or under a sidewalk, or anything that requires hand digging). For that they charge by the foot. That goes anywhere from $2 - $8 per foot. I also found out that most gas subs will disavow all responsibility for any broken landscaping piping that they break. Others will not as long as they are notified of them upfront. on how many BTUs your device is capable of and how long the run is) to your various hookups. Each item hookup also requires a Tee and Risor and is terminated with a key valve. The key valve is what will be visible on the surface of the Fireplace or Firepit. Its a valve that is turned on or off with a key. You can see a picture of it to the left. When I called Barbeques Galore here in Chandler, they told me that even their biggest BBQ units only required 1/2" gas line. When I checked with the subs, no one did anything smaller than 3/4" PE. I guess they do that as a margin of safety. The only other thing they charge for is if they have to do hard digs (through a lot of rocks, or under a sidewalk, or anything that requires hand digging). For that they charge by the foot. That goes anywhere from $2 - $8 per foot. I also found out that most gas subs will disavow all responsibility for any broken landscaping piping that they break. Others will not as long as they are notified of them upfront.
One other thing I found out - gas subs really do not have to come in at the point I listed in the Table of Contents. No other sub really depends on them until decking is poured, and that's only if you are planning to run gas lines through the concrete decking to some BBQ unit or other gas-powered device. The gas subs for sure need the heater to be present so that they can do the hookup, which means the plumbers have to set down the equipment before they can FINISH their work, but they can come in as late as just before the decking concrete is poured. However, if you ask most gas subs, they would rather come in earlier rather than later. The reason for this is that by city code, they are required to bury their lines the deepest (18") and they would stand a higher chance of breaking other lines - PVC or electrical - since those lines are buried at a shallower depth (6").
 I went with AZ Gas Piping as my gas sub. Ray is a great guy. He was probably the most engaging and helpful sub that I dealt with during my pool building experience. He sat and talked with me for about an hour one night as he came to do my bid. He made sure I understood exactly what he was going to do, even though I didn't really need to know all the details. But I'm glad he did. I the wiser for it now and understand gas work much better now. He's only been in business about a year or two and has done about 50 jobs to date. However, he has never gotten a complaint and has never had to go back to fix anything. He's got a clean record at the ROC and just an all-around friendly guy. He also gave me the names of tons of other subs who he said he would stake his reputation on. He even invited me over to his house to check out how he did his pool / spa / backyard / deck to get some ideas. I went with AZ Gas Piping as my gas sub. Ray is a great guy. He was probably the most engaging and helpful sub that I dealt with during my pool building experience. He sat and talked with me for about an hour one night as he came to do my bid. He made sure I understood exactly what he was going to do, even though I didn't really need to know all the details. But I'm glad he did. I the wiser for it now and understand gas work much better now. He's only been in business about a year or two and has done about 50 jobs to date. However, he has never gotten a complaint and has never had to go back to fix anything. He's got a clean record at the ROC and just an all-around friendly guy. He also gave me the names of tons of other subs who he said he would stake his reputation on. He even invited me over to his house to check out how he did his pool / spa / backyard / deck to get some ideas.
The gas line installation process has a lot of steps but is pretty straightforward.
-
An 18" deep trench is dug (thats code in the City of Chandler - YMMV) from the gas meter to the back of the equipment pad where the gas-powered heater sits. Additional trenching is done from that spot to other areas where gas will be needed for other devices. In my case, that would also include a BBQ, a beehive fireplace, and a fire ring.
-
The main Polyethylene line is laid from the gas meter all the way back to the heater where a riser and "T" are installed. From there, 3/4" Polyethylene is tapped from the 1-1/2" main and makes it way back to each of the other gas devices where riser's and T's are installed for each. Where any PE line will be under decking, the line will be sleeved with a PVC pipe that needs to be twice the size of the PE pipe (so if 3/4" PE is used, PVC must be at least 1-1/2" - don't know about the schedule though) for safety reasons. The pipe is not actually hooked up to the gas meter at this point. It is left stubbed up with a metal cap until after the inspection is done. The homeowner is responsible for calling the gas company to have them come out to install a new gas meter for the additional gas run. This is done typically after final inspection but before the interior sub comes through. The heater must be hooked up and functional prior to start-up because that's when all the equipment gets tested out.
-
By code, #18 AWG tracer wire must be laid down on top of all the gas piping that is put into the ground. This tracer wire is used by Bluestake and Gas officials to locate where gas pipes are run. I don't know what they use, but apparently they have some kind of detection device that can sense metal wire down 18" deep in the ground.
-
The entire run of piping is pressurized to 65psi with an air compressor. The City of Chandler requires at least 60psi for 30 minutes when they come to do the inspection. This inspection is done independently of the two pool inspections. The pipes are pressured to at least 65psi to account for fluctuations in the pipe pressure due to temperature variations throughout the day.
-
The trench that the pipe is laid in is left open and bare for the inspection.
-
The City Inspector comes through and makes sure everything is done according to code. If it is, the site will be "Green-tagged" which means that it passed. If not, it will be "Red-tagged" which means there are problems and that Ray has to come back out to fix the problem before the next inspection.
-
Once the job has been "Green-tagged" the trench is filled in.
-
After the forms for the decking goes in, Ray comes back to set the key ring/valve for the fire ring. He does this right after the forms go up but before the concrete is poured so that he knows at what elevation/height to set the key ring/valve so that it will be flush with the deck surface. At this time he also hooks up the gas heater.
-
After decking is done and after final inspection, Ray will finish up the key valve so that its flush with the top of the deck.
-
After the BBQ and Fireplace go in, the BBQ will be hooked up to the gas line and the key valve will be set on the Fireplace.
-
After final inspection, but before interior, the homeowner (that's me) needs to call up the gas company to hook up the new meter. Ray would then come back and tap his main line into this meter and turn everything on. He would then perform final tests to make sure everything is in good working order.
Friday, September 20, 2002 - 8:14AM
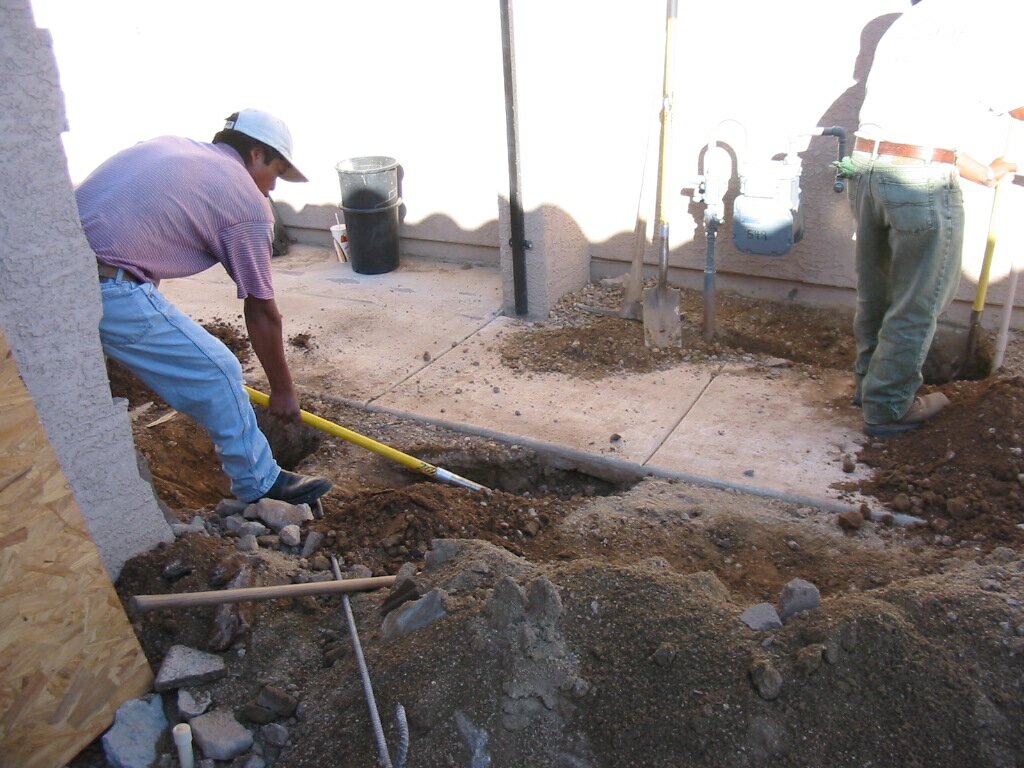
  Ray showed up bright and early on Friday morning to start the job. For the work, Ray brought two helpers with him. Their job for the day was to do all the trenching. Ray would be marking the areas where the key valves and the gas lines were going to go and would be working the trenching machine for the gas runs. Ray's assistants started out by clearing out a tunnel underneath my existing sidewalk to go from the gas meter to the other side where the main run would start towards the back of the house. For that part, there was nothing better than just some shovels and some hard work. Ray showed up bright and early on Friday morning to start the job. For the work, Ray brought two helpers with him. Their job for the day was to do all the trenching. Ray would be marking the areas where the key valves and the gas lines were going to go and would be working the trenching machine for the gas runs. Ray's assistants started out by clearing out a tunnel underneath my existing sidewalk to go from the gas meter to the other side where the main run would start towards the back of the house. For that part, there was nothing better than just some shovels and some hard work.
 You can see the gas meter in the first picture to the left. Its in the upper left corner of the picture against the wall. They needed to tunnel under the sidewalk to the other side where the open dirt path to the back runs. I was surprised that they didn't need to use a jet water hose to blast through there. The guys were very efficient. Once they got under the sidewalk, they had to tunnel under the fence footer. The footer seemed like it was close to 2ft below grade. It was just a solid nuisance and they really had to work to get under that thing. You can see in the middle and right pictures the hole they had to dig to get through. I took a picture of the footer tunnel as I stood directly above it and man, it was cavernous. You can see the gas meter in the first picture to the left. Its in the upper left corner of the picture against the wall. They needed to tunnel under the sidewalk to the other side where the open dirt path to the back runs. I was surprised that they didn't need to use a jet water hose to blast through there. The guys were very efficient. Once they got under the sidewalk, they had to tunnel under the fence footer. The footer seemed like it was close to 2ft below grade. It was just a solid nuisance and they really had to work to get under that thing. You can see in the middle and right pictures the hole they had to dig to get through. I took a picture of the footer tunnel as I stood directly above it and man, it was cavernous.
  
Ray's first task was to determine where the riser's and T's were going to be located. There was quite a bit of reworking of the whole deck area and where the BBQ and Beehive Fireplace (FP) were to be located from the original plan. The original plan called for the FP and BBQ units to be sitting on the deck. I had not realized how small the deck area was going to be with a 9 ft radius. After going through some discussions with Ray (and him graciously letting me come over to his residence to see how he laid out his backyard decking), I decided that for space considerations I would move the BBQ and FP off the deck and against the wall and corner of the property. After seeing how much space a standard patio table with four chairs takes up on the deck, I really didn't have a choice.
The picture below shows the new locations for the BBQ and Beehive FP. You can see that they are now up against the property line to conserve deck space. During discussions with Ray, I also decided to throw in a gas-powered Fire Pit. I was over at Ray's place and saw his Fire Pit and thought it was the coolest thing. He said he could do that for me for any extra $250. That would include running the 3/4" PE gas line and setting the fire ring and the key valve. Deal. The hole for the Fire Pit would be 30" in diameter. An fire ring 18" in diameter would be placed into the hole. These changes/additions forced Ray to have to go back to the City of Chandler and make an addendum to the plan that he had submitted weeks earlier. Fortunately, he was able to get away with paying only an additional $25 for a new plan review fee. I didn't want to have to start the whole process over and have to pay the permit fee as well.

The red lines show where the gas pipes are going to be placed in the ground. Again, all the pipes are required by code to be 18" below grade. The runs will include:
-
The main run from the gas meter to the heater - it will be 1-1/2" PE
-
The additional device runs from the heater to the BBQ, FP, and Fire Pit / Fire Ring - they each will be 3/4" PE
Ray started off by measuring the distance from the wall the Beehive Fireplace valve was going to be located. I didn't have the exact plans for the FP at the time, so we had to make an educated guess as to the best place to put it. We decided to place the valve close to the wall (so that it would be hidden inside the FP) about 5'4" from the back wall. You can see Ray measuring off the distance from the back wall and spraying a bright orange dot on the ground where the riser and T will come out.
  
Next was the BBQ. In the middle picture below, you can see Ray drawing in the line that represents the right edge of the BBQ. Just below the tape measure in the same picture, he drew in the thickness of the masonry block (8") to make sure we cleared that. In the last picture to the right, you can see where he placed the valve location. Its the bright orange spot just in front of the shovel's nose. Its marked about 12 inches from the wall and about 18" away from the right edge of the BBQ.
  
Last, but not least - the fire ring. Ray first marked off the center of the deck with a small "+" sign, then drew a circle around it to represent the size of the outer hole and a small inner circle (part of it anyway) to show where the fire ring was going to sit in relation to the bigger hole. The hole in the ground would have a 30" diameter and the fire ring itself would be a 18" diameter ring. By code, the key valve for the fire ring had to be no more than 3 ft away from the edge of the ring. In the picture to the right, you can see Ray marking off a bright orange spot for where he wanted to locate the key valve, then making sure it was within the 3 ft requirement.
  
After all the markings were made, Ray took the ditch witch (or is it a trench wench?) trenching machine and started going after it. That thing really hummed. He started first at the Beehive Fireplace and cut a little 4 ft trench for it near the back corner of the lot.
  
After finishing that, he continued to work the other two runs - one for the BBQ and one for the fire ring. You can see the finished runs in the picture in the middle below. The picture to the right show the addition little jog over to the area for the fire ring.
  
After finishing that side of it, Ray had to moved over to the equipment area for the main run. To connect the two sides, Ray had to burrow underneath the mountain of PVC plumbing and electrical conduit to get through to the other side. You can see in the picture below to the left, the tunnel that he had to create to get through. From there, he started to work his way from the equipment all the way to the front of the house. You can see him starting to plow through to the front in the picture to the right.
  
I had to run out for a lunch meeting, but when I came back, Ray and his crew had already left. My wife told me that Ray said that they had finished up the trenching and would be back on Monday to lay the pipe. She also mentioned that the electrical guys were in for about an hour to do something, but she wasn't sure what. They had asked her some questions about the job, but since she couldn't answer the questions, they left for lunch. When I went back outside to survey the work, this is what I saw:
  
  
And thats about it for the first day. It took them about 7-8 hours, but at the end of it, they finished completely trenching 18" below grade from the gas meter at the front of the house, all the way to the equipment and to the deck area for the other devices. They left just after 3PM on Friday. Ray said that they would be back on Monday morning to lay the pipes and to finish the rest of the work.
<- Electrical 3rd Day - Back Next - Gas Pipes - 2nd Day ->
|


