|
Shotcrete
Prerequisites for Shotcrete:
 Shotcrete (pneumatically applied concrete) is the material that forms the shell of your pool. Here in AZ, concrete pool shells are typically 6 inches thick in the wall and floor areas and 8 inches thick in the cove areas (radius between the wall and floor area) for a Basic (80/400) Pool. As the pool gets larger and deeper (for diving pools), these minimum thicknesses will increase based on the structural plan drawn up by the Structural Engineer. The top 6 inch portion of the pool shell (that forms the lip around the perimeter of the pool) is called the Bond Beam. The bond beam is 12 inches thick - twice as thick as the pool walls - and it adds extra support to increase the structural integrity of the pool shell. The top of the Bond Beam is referred to as 0" Pool Bond Beam or just Zero Bond Beam for short. Zero Bond Beam is often referred to as the "elevation" of the pool. Shooting a thicker shell (12" BB, 6" Walls/Floors, 8" Coves) for a Basic Pool is using more concrete than is necessary and a waste of your money. Unless there is a special circumstance, extra concrete beyond these specifications doesn't add any additional benefit to the structural integrity of the pool. Shotcrete (pneumatically applied concrete) is the material that forms the shell of your pool. Here in AZ, concrete pool shells are typically 6 inches thick in the wall and floor areas and 8 inches thick in the cove areas (radius between the wall and floor area) for a Basic (80/400) Pool. As the pool gets larger and deeper (for diving pools), these minimum thicknesses will increase based on the structural plan drawn up by the Structural Engineer. The top 6 inch portion of the pool shell (that forms the lip around the perimeter of the pool) is called the Bond Beam. The bond beam is 12 inches thick - twice as thick as the pool walls - and it adds extra support to increase the structural integrity of the pool shell. The top of the Bond Beam is referred to as 0" Pool Bond Beam or just Zero Bond Beam for short. Zero Bond Beam is often referred to as the "elevation" of the pool. Shooting a thicker shell (12" BB, 6" Walls/Floors, 8" Coves) for a Basic Pool is using more concrete than is necessary and a waste of your money. Unless there is a special circumstance, extra concrete beyond these specifications doesn't add any additional benefit to the structural integrity of the pool.
The shotcrete subs are responsible for "shooting" the concrete that will form the shell for your pool. The concrete that they use is a low-slump (low moisture) six-sack mix that is pneumatically applied (delivered by compressed air) at 100-150 psi pressure. The compressive strength of the concrete is 3000 psi when its delivered and rises to 4000-5000 psi after 28 days of curing. Concrete with low water-cement ratios improves its strength.
CONTINUED BELOW
ADVERTISEMENT
This is highly desirable as it makes it more resistant to shrinkage/cracking, freezing, thawing, permeability (i.e. water-tightness), and wear in general. The concrete is applied to the walls of the excavation over the steel rebar reinforcement. Fibermesh (small polypropylene fibers) is typically added to the concrete when the floor is shot. The fibermesh helps to prevent these cracks from becoming too large during the drying/curing process.
 
Cracking is the most common problem with using concrete. And concrete shrinkage during the curing process is the main cause of cracking. As new concrete hardens and dries, it shrinks. This is due to the evaporation of moisture from the concrete. Shrinkage cracks occur when the concrete dries too rapidly. The first 24 hours is when most shrinkage cracks occur. Keeping new concrete wet insures that the curing process occurs at the proper rate. Keeping the concrete wet during the critical curing process insures that the concrete retains moisture as the concrete gains strength and it delays drying shrinkages until the concrete is strong enough to resist it. Typically after the shotcrete has been applied, the homeowner is required to hose down the pool shell 3-4 times a day for 5-7 days. This slows the curing process down, and prevents the surface from developing even more cracks. They say that after concrete is placed, its strength increases very quickly for a period of 3 - 7 days and that it reaches 80% of its full strength after 3 days of curing.
From what I've read, shotcrete has become the most common method of concrete construction because it doesn't require forms (other than the small form at the top of the pool for the bond beam), making it quicker, more flexible in its application and in design, and less labor-intensive and less expensive than pouring concrete.
I use the terms Gunite and Shotcrete interchangeably (and will throughout this site), but there is a difference, technically. The main difference between Gunite and Shotcrete is that Gunite equates to dry-mix process shotcrete while the term "shotcrete" usually describes the wet-mix shotcrete process. For my job, they used Shotcrete. This means that the concrete-to-water mix ratio is pre-determined at the plant where the concrete is made. With Gunite, the nozzleman is responsible for making sure that the proper water to concrete mix ratio is achieved on-the-fly as he shoots the concrete. Personally, I would prefer Shotcrete to Gunite. It just seems that if the mix is pre-done at the plant, it would be more accurate, and less dependent on the nozzleman. No offense to the nozzleman, but I wouldn't want the nozzleman to be shooting my pool the day after he had a bad fight with his wife or something like that. Wouldn't it be wild if you had a running feud with your neighbor for years and one day you decide to do a pool. And when the Gunite people show up to do the job, you find out that the nozzleman is your neighbor? Would that be like your worst nightmare or what?
There are a couple of key pieces of equipment needed to make the process work. The first is the line pump that the concrete will be fed into. You can see a picture of it on the left below. On the right is a picture of the compressor that creates the high pressure needed to deliver the shotcrete.
 
Here are the other tools that the shotcrete subs use. The black hose on the left delivers the shotcrete from the pump to the final destination in the pool. The red hose in the middle contains the compressed air that forces the shotcrete out of the hose. The last picture shows the two connected together as used by the person delivering the shotcrete. Note: For anyone who would like to attempt to shotcrete a pool themselves, you can refer to this document.
  
One of the main things to look for in a shotcrete sub is their ability to bid out the exact amount of shotcrete needed for the job with good accuracy. Typically, the shotcrete subs start their estimate based on the size and volume of your pool. Then they add extra concrete for things like raised spas, steps and benches, waterfall pads, rolled bond beam (since its raised), underwater tables, and anything else that requires more concrete. During my time visiting with pool builders, many mentioned to me how the inexperienced builders don't calculate "overbreak" properly. Because of that poor planning, the homeowner gets hit with a bill for extra truck trips and more concrete on the day of the shoot. Ultimately, its not how good the builder is but how good the shotcrete sub is. The reality is that any good shotcrete sub will do a pre-site inspection. The main bidder of the shotcrete sub that I selected worked with me through every step of the way, asking detailed questions about every aspect of the pool features in an attempt to get a precise bid.
Typically what happens prior to the job, the shotcrete company will send out a foreman to determine how much extra shotcrete is needed due to overbreak conditions. Overbreak is the general term the shotcrete industry uses to refer to conditions where extra unforeseen shotcrete will be needed to compensate for:
- Uneven pockets of earth in the excavation
- Areas where the excavators overdug or incorrectly dug.
- Changes in the pool design since it was originally sent in for bidding
- or in my specific case, where I had to move the spa dam wall back to create a +12" step in the waterfall area near the spa (incidentally, that area was estimated by the pre-siter to require an extra yard of concrete).
The pre-site foreman will carefully examine the excavation and other key areas and will make a determination of any extra concrete to order. Typically, the extra concrete is measured by yardage. A yard of concrete is a 3ft x 3ft x 3ft cube of concrete. Concrete typically runs about $90-$120 per yard. When I first saw the humongous cage of steel that the modified spa dam wall created, I thought for sure all that extra concrete would break the bank. I was pleasantly relieved to find out that it was only going to be another hundred bucks or so to fill it.
Friday, August 30, 2002 - 2:32PM
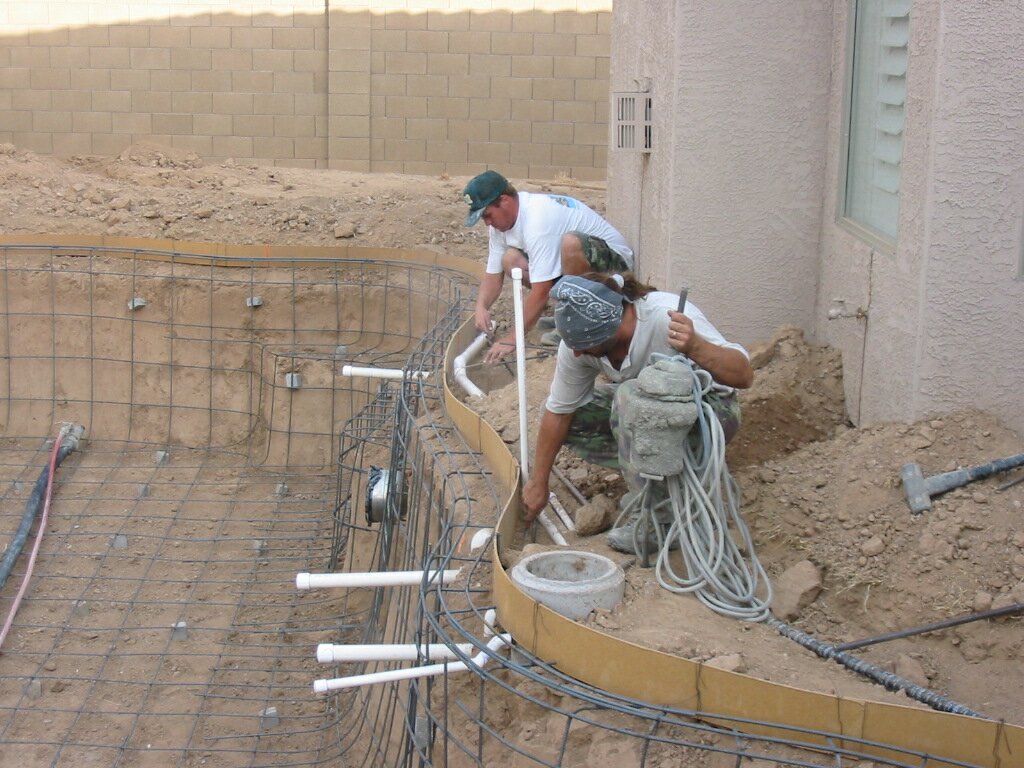
My pre-site foreman was Ray, who has been doing shotcrete since 1970. He actually arrived on the Friday that I had a whole bunch of activity going on at the time. The steel guys had just finished and the electricians were busy at work. Ray kind of just slipped in and fortunately I caught him out of the corner of my eye and went outside to meet him. One thing he mentioned to me right off the bat was how "clean" my excavation was. He said that typically by the time plumbers, electricians, steel have come through the pool, the nice clean "edges" on the pool by the form area will have collapsed/caved in and it will tend to look pretty sloppy. Its not a problem, though, as his guys are trained to compensate for all that if necessary. He looked over the pool very carefully for a few minutes, then came back and said that due to changes in the pool design I was going to need an extra 2 yards of concrete. That wasn't too bad. He said that 1-1/2 yards was for that waterfall pad that went from +0 to +12". One interesting thing Ray mentioned to me (can't confirm this) about the 6" thick walls they shoot is that it wasn't always done like that. He said in the "old days," they used to only shoot 4" walls which was sufficient. But because of expansive soil problems, they had to shoot 6" walls in those cities that had extra bad conditions. Pretty soon, they were shooting 6" walls everywhere just so that they didn't have to figure out which city had the bad expansive soil conditions and which didn't.
Very cool - I was now set for the shotcrete guys. I had originally scheduled them to come in on Thursday, September 5, but due to the change I wanted to make to the skimmer/main drain, I lost a day on that, and had to re-schedule for Friday.
Friday, September 6, 2002 - 6:54AM
 The shotcrete crew showed up bright and early on Friday morning - just before 7am. The foreman's name was Duane. Duane has been with the company for 10 years. He said that he does about 1-2 pools a day on average, but that during the height of the summer months, he does up to 3-4 a day. Scott, one of his senior crew members told me that he has been with the company for over 9 years. Then there's Brandon, the nozzleman (7 years), and Benji (5-1/2 years). Duane said that for my job, they had ordered 3 concrete trucks. Each would be bringing in a load of 10 yards of concrete about an hour or so apart. The first truck would be arriving at about 7:30am. The shotcrete crew showed up bright and early on Friday morning - just before 7am. The foreman's name was Duane. Duane has been with the company for 10 years. He said that he does about 1-2 pools a day on average, but that during the height of the summer months, he does up to 3-4 a day. Scott, one of his senior crew members told me that he has been with the company for over 9 years. Then there's Brandon, the nozzleman (7 years), and Benji (5-1/2 years). Duane said that for my job, they had ordered 3 concrete trucks. Each would be bringing in a load of 10 yards of concrete about an hour or so apart. The first truck would be arriving at about 7:30am.
While they were waiting, the crew members started to get all the equipment ready. Brandon started to unravel the shotcrete hose and the air hose and started dragging it towards the pool area.
  
Meanwhile, below, you can see Duane starting to put up some additional pegboard form around the spa dam wall area where the 12" dam wall is going up. Forms are needed since there's nothing to hold up the shotcrete in that area.
  
When Duane was done with that, he started to pound steel rods into the ground on both sides of the pool along the long walls. After putting in the rods, he used heavy gauge wire and tied one end to the rod and the other side to the steel reinforcement. I asked him what he was doing and he said that its to keep the wall secure in case it starts to fall over due to the weight of the concrete. He said in the past, they've had situations where the whole concrete wall has come collapsing down on them and its just a precautionary measure.
 
Next, Benji starts to put up the canvas around the areas of the pool where the guy applying the shotcrete will be shooting. Its a real messy process and this prevents the shotcrete from splattering all over the house and perimeter walls. Its starting to look like a real big event now.
  
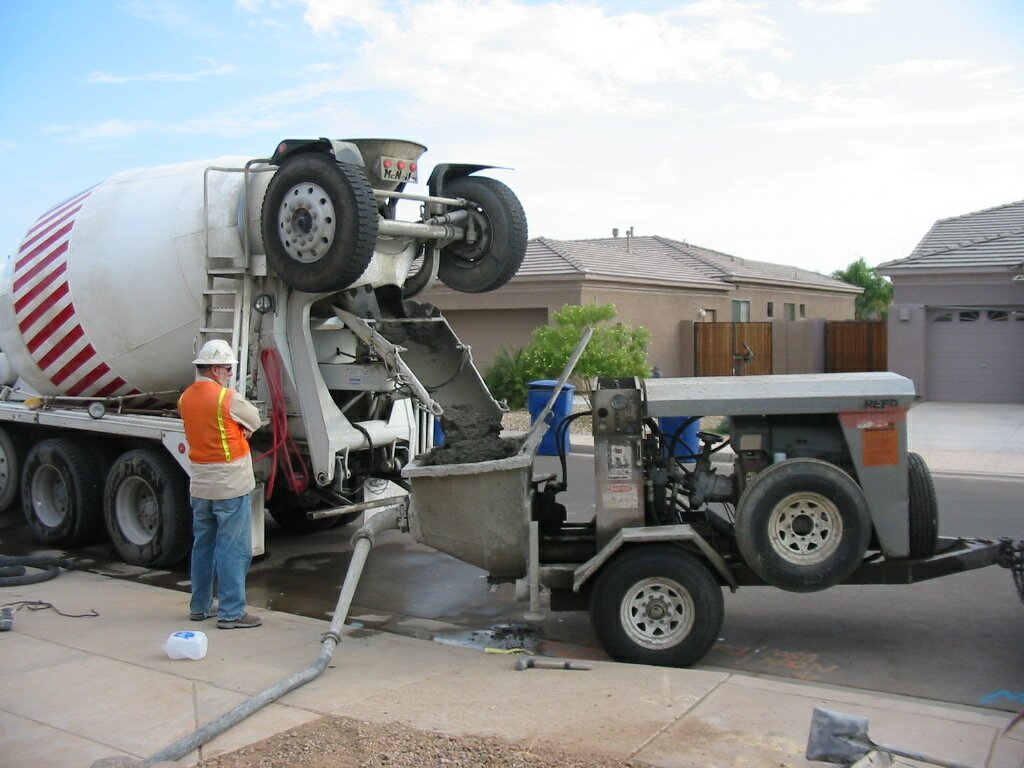
The first concrete truck showed up right around 7:30am. The truck pulled up along side of the pump, lowered its slide, and started feeding the concrete into the hopper attached to the back of the line pump. The driver stood there and supervised the concrete feeding process into the pump. He stood there until the whole truck was emptied.
 
After all the prep work is done, its time to get started. Brandon first wets down the area that's going to receive the shotcrete, then lets the concrete fly!
 
With my digital camera, I was able to switch it over to movie mode and capture some short snippets of Brandon at work. I took this 10 second snippet of him starting on the spa dam wall. I have to warn you that its a relatively big file. The file size is 2.9MB and the video is 320 x 240 resolution. To view it you need either the QuickTime viewer or Windows Media Player. You can download QuickTime or Windows Media Player for free from the respective sites by clicking on the icons below (NOTE: a little later, I discovered that there was a lower resolution setting on the camera that gave me ~1MB video files with 160 x 120 resolution. If you don't want to download this big file, there are smaller files a little later in the job).
  
The application of shotcrete is first done near the spa dam wall then moves around to the steps. This is where Brandon will exit the pool once he's finished shooting the whole pool. Its important to start here so that the shotcrete has ample time to dry. Otherwise, he won't be able to get out without messing up the shotcrete (note: the pictures below didn't turn out so well because I took it from inside the house through the window. You can see the glare from the window).
 
I noticed that the applied shotcrete has a really fluffy and soft consistency - kind of like how cotton candy looks when its blown out of a cotton candy machine. It looks like its easy to shape and work with. Meanwhile, Duane started to shape and form the bond beam around the entry step area. He used a long flat hand trowel-like instrument to do the shaping. I mentioned to him the issue of having enough distance from the window to the water's edge to cover the 5 ft requirement. I did some measuring myself and noticed that it was under 5 feet. I asked him to give me enough to insure I would pass inspection. He said he did and measured again and said that it was exactly 4 feet 10.5 inches. With the 1.5 inch cantilever decking overhang, that brings it to 5 feet exactly. And with the extra inch that I get with the windows being inset from the wall, he said that I should have no problem passing inspection.
  
Brandon swung around and started on the waterfall area. I was especially curious how long it was going to take to fill up that 7 foot long 12" cage. That's a lot of concrete by anyone's estimation. It took him about 10-15 minutes to fill up the entire cage.
  
Here's another little snippet of video of Brandon shooting the waterfall area (2.4MB - 320 x 240 resolution)

While Brandon was working the waterfall area, Duane started on the skimmer area. You can see him working in the picture below to the left. Meanwhile, Scott was making sure that the depth of the entry step from the top to the bond beam to the floor was exactly 9" deep (the water in that area will be only 6" deep since the water line is 3" below zero bond beam). You can see him starting to smooth the floor out with a long flat troweling tool.
  
Next, Duane started to make his way from the skimmer to the dam wall, then to the waterfall, smoothing everything down in his path as he worked his way around. You can see Scott shaping the entry step in the pool.
  
It was really cool to watch these guys work. I could tell they were highly skilled in  their craft. It was amazing to see them make perfect cuts in the concrete and keep everything at the right elevation. To help them keep a consistent elevation, they used a device that they referred to as a water leveler. Scott tried to explain it to me, but I didn't fully understand how it works. You can see him setting it up in the picture to the left. Basically how it works is they fill it with water and set the device next to a form so that the water level coincides with the top of the form. They have this super long tube/hose that connects to the device. With it they can go anywhere in the pool with the other end of the tube and know exactly where the water level for +0" elevation (zero bond beam) is. The water at the end of the tube will automatically adjust itself so that it always remains at the same level as the water level in the device. I'm guessing that it just uses atmospheric pressure to achieve that. As the guys continued working, I noticed they dragged this tube with them every time they needed to make sure everything was at an even level of elevation. their craft. It was amazing to see them make perfect cuts in the concrete and keep everything at the right elevation. To help them keep a consistent elevation, they used a device that they referred to as a water leveler. Scott tried to explain it to me, but I didn't fully understand how it works. You can see him setting it up in the picture to the left. Basically how it works is they fill it with water and set the device next to a form so that the water level coincides with the top of the form. They have this super long tube/hose that connects to the device. With it they can go anywhere in the pool with the other end of the tube and know exactly where the water level for +0" elevation (zero bond beam) is. The water at the end of the tube will automatically adjust itself so that it always remains at the same level as the water level in the device. I'm guessing that it just uses atmospheric pressure to achieve that. As the guys continued working, I noticed they dragged this tube with them every time they needed to make sure everything was at an even level of elevation.
 
You can see in the pictures above Duane using this water leveler to determine where the zero bond beam is located, then making marks every few feet or so in the concrete. After making the marks, he used the long hand trowel tool to level the concrete to zero bond beam.
You can see in the first picture below the finished waterfall pad at zero bond beam. Meanwhile, Brandon slowly made his way towards the back of the pool, hitting the back bench. Another crew member started forming the 2nd and 3rd steps for the pool out of solid concrete. There is no extra steel reinforcement in the steps themselves, only what was hugging the wall climbing up to the first step. Its looking real good.
  
Here's another video snippet of Brandon hitting the back of the pool (3.1MB - 320 x 240 resolution)

Its pretty amazing how fast the shotcrete dries. Notice in the first picture below how Duane is walking on the +0" area of the waterfall pad. About 30 minutes had passed from the time that Duane finished shaping that area to the time he started walking on it. In that same picture you can see the finished work on the dam wall/spillway. For the notch in the dam wall where the water from the spa will spill into the pool, Duane typically made the cut 3" deep. He asked me if I was planning to put a flat piece of stone or something there. I said I was, so he made the notch 5" deep instead of 3" to account for a 2" thick piece of stone. He also applied a nice bull-nose edge along the length of it.
The middle picture shows the umbrella hole inside the first step. Any holes inside of the pool have to be made by the shotcrete subs during this phase. Otherwise, the interior people will have a heck of a time drilling through solid concrete later. The last picture shows the whole crew hard at work with different areas of the pool. Its kind of interesting that they're all in there at the same time, shaping the top areas of the pool. It seems they are painting themselves right into a corner. In reality, the entry step, which is the first thing they worked on, it hardening quite nicely and by the time they are finished, should be amply dry to walk out from.
  
The next two pictures show Duane finishing up the +0" part of the waterfall pad. When he's done with that, he moves onto the rolled bond beam. The picture to the right shows the unfinished -9" part of the pad and the bench beneath the waterfall.
 
The next two pictures shows Scott applying some final touches to the waterfall pad and what the near completed pad looks like. Notice that the -9" step down for the underwater boulder effect is now clearly visible with the bench under the waterfall.
 
Next, Duane started working on the rolled bond-beam. That was pretty cool to watch. He builds up that area an extra 3" higher than the bond beam, then uses his long trowel tool to cut an angled bevel across the entire length. You can see Benji continue shaping the pool walls near the back.
  
 At 9:48am, the second concrete truck arrived and took the place of the first one, which was completely empty now. If you look back at the last few series of pictures, you'll get a sense for how much 10 yards of concrete really is. My pool project was estimated at just a tad under 3 trucks (28 yards total). It was interesting that the first truck tool over 2 hours to empty. The third truck ended up arriving about half an hour after the 2nd truck. The first truck seemed to take the longest to empty. This is partly due to all the set up time. Once the guys got going, the second and third trucks were emptied pretty quickly! At 9:48am, the second concrete truck arrived and took the place of the first one, which was completely empty now. If you look back at the last few series of pictures, you'll get a sense for how much 10 yards of concrete really is. My pool project was estimated at just a tad under 3 trucks (28 yards total). It was interesting that the first truck tool over 2 hours to empty. The third truck ended up arriving about half an hour after the 2nd truck. The first truck seemed to take the longest to empty. This is partly due to all the set up time. Once the guys got going, the second and third trucks were emptied pretty quickly!
Here you see that the far end of the pool is almost completely done. It was at this point where I found that that there was another video mode on the digital camera that allowed me to reduce the resolution of the video (160 x 120). I was able to get almost 3 times the amount of footage (27 sec) and the file size was still considerably smaller (2.4MB) than its 320x240 counterpart.
 
Below you see some final touches being applied to the far end of the pool and to the waterfall area. At this point, the crew is stepping through the entry step of the pool with no problem. I jumped on there myself and noticed that its as hard as can be. They can use this area to come and go out of the pool with no problem.
  
It seemed as quick as the 2nd truck arrived, it had also been emptied in no less time. Less than an hour after the 2nd truck arrived, the 3rd truck showed up. Here's the 2nd truck cleaning up and getting ready to move on out as the 3rd truck waits across the street.
 
At this point, almost all of the shotcrete is being focused on the floor of the pool. This is the point where they add the fiber-mesh to the shotcrete. Fiber-mesh consists of loose fiber particles that looks like short strands of threads. Duane showed me some that they brought along in small plastic bags. They just throw it into the hopper that is fed by the concrete trucks. The fiber-mesh strengthens the concrete flooring of the pool and makes it more resistant to cracking during the drying/curing process. If you look at the pictures below, you can see the whole upper portion of the pool is complete. You can see the finished waterfall pad along with Benji putting the finishing touches near the base.
  
Here's another couple of snippets of video of Brandon focusing the remaining shotcrete on the floor (160 x 120 - 1.0MB and 1.1MB respectively)
 
You can really get a sense for how close they are to finishing in these next series of shots. At this juncture, no more shotcrete is being applied to the floor. Most of the work is now smoothing out what's already there. I took some shots stepping back a little to show what the pool looks like at this stage. Man, I can see and taste the water already ...
 
 
Here are some shots of the finished features. The waterfall pad is completely done and dry. The first entry step into the pool has been sprayed down a little to keep it cool during the curing process which is underway. The last picture shows the finished floor with some extra water beginning to collect near the drain area.
  
 Next up: the spa. During the time the whole crew was focused on the pool, the spa was getting neglected. They originally started to shoot some of the flooring for the spa, then left it to do the pool. I'm guessing there was a reason for this, but I didn't even realize it until I was going through my pictures later getting it ready for this page. Here's a picture of it with it partially filled. Maybe they needed to let the shotcrete settle a bit? I'm not sure. I do know that when they were putting the steel in the spa, that at some points, the clearance of the steel to the earth was close to 8 inches! I was told this was normal for a spa. This is in contrast to a pool where its pretty uniformly 3" from steel to earth. I don't know if that has anything to do with it. Next up: the spa. During the time the whole crew was focused on the pool, the spa was getting neglected. They originally started to shoot some of the flooring for the spa, then left it to do the pool. I'm guessing there was a reason for this, but I didn't even realize it until I was going through my pictures later getting it ready for this page. Here's a picture of it with it partially filled. Maybe they needed to let the shotcrete settle a bit? I'm not sure. I do know that when they were putting the steel in the spa, that at some points, the clearance of the steel to the earth was close to 8 inches! I was told this was normal for a spa. This is in contrast to a pool where its pretty uniformly 3" from steel to earth. I don't know if that has anything to do with it.
Here are the last two video snippets of the spa being shot. I was able to take 10 second snippets in both 160x120 and 320x240 resolutions. The file sizes are 1.2MB and 2.7MB respectively.
 
After the shotcrete is done, Scott starts to shape and smooth things out using a hand trowel. Here you see him apply the finishing touches to the spa. When he was done, it didn't look like the spa had a perfect circle inside. I asked if he could shape it better. He said, "You're paying a lot of money for this, so I'll do it any way you want it." That really made my day. He was very patient with my perfectionist tendencies. Scott is a true professional. In fact, by this time, the rest of the crew had taken off. He was the last one to leave because of the spa.
  
Here are some shots of the finished spa.
 
And thats it! The shotcrete phase is done. The crew was done by about 11:56am. From start to finish, they only took about 4.5 hours. Here are some final shots of the pool after the guys had left
  
Well, its looks like we're heading for the home stretch! Next up is the rockworks sub who will be putting in the waterfall for the pool. As far as the major work, after that its the decking, then interior. I can feel the water now already ...
Problems with the Shotcrete Phase / Things I would have done differently:
- Later on (during the rockwork phase), I noticed where the sun's position was during the hotter part of the afternoon and realized that where the umbrella hole is, the extended umbrella would barely cover half of my body. If I would have planned that better, I would have moved the hole closer to the edge of the step. That's Ok. I'll check with the interior people to see what it would take to put an extra umbrella hole in the first step by drilling.
<- City Inspection #1 - Back Next - Rockwork ->
|